Did you know that you can convert any Photoshop brush to a mixer/blender brush by holding down ctrl+alt on Windows or Cmd+Option and clicking on it? I show you how in less than 30 seconds in this Photoshop video tutorial.
Keep in mind that not all brushes will make ideal mixer brushes and you will almost certainly want to tweak it once you make it.
A customer told me that she always works in 600 dpi and wanted to put her artwork into an Art Surface and make sure it remained at 600 dpi so I made this video for her, showing two different ways to do it. There’s a text summary below the video
Method 1
Change the dpi to 600 dpi with resampling off (unchecked) Then paste your 600 dpi image into it (into the green ‘Artwork’ layer)
Then you can use the crop tool to increase your canvas size to any size you need and the background will magically fill in the paper texture seamlessly. Continue reading How to Scale a Photoshop Art Surface Paper texture to 600dpi
UPDATE 2020: Simplest method of all…while painting, hold down the TILDE key: `(usually at the top left of your keyboard while you are painting and your brush will turn into an eraser, with all the same properties, as long as you hold it down)
If, like me, you loved being able to select any tool (usually the eraser) and then pick from your most recent brushes to convert a paint brush to an eraser, or a mixer brush, or a smudge tool with all dynamic setting intact you can’t do this anymore with the latest Photoshop update (v 19) You can still use the clear mode trick to convert your brush to an eraser which I go over in the aboce video inclusing the keyboard shortcuts.
The keyboard shortcut I use in the video are
Normal Mode:
WIN: Shift+Alt+N
MAC: Shift+Alt+N)
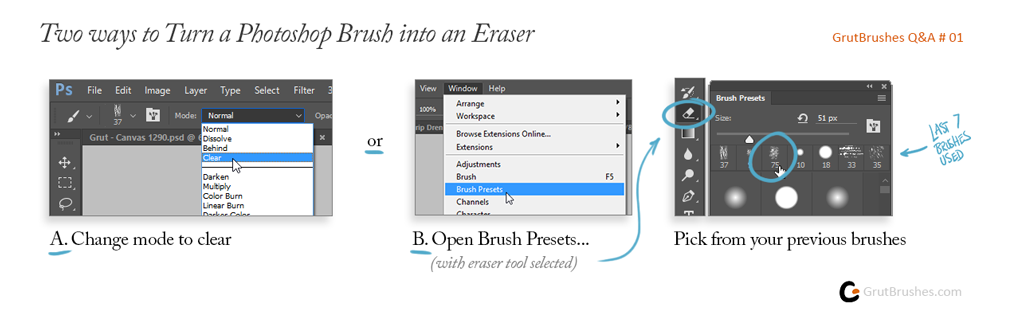
Q: George asked me in an email: “Is there any way to use these brushes as an eraser?”
A: Yes! If you’re painting or drawing in Photoshop using a brush that has a nice organic brush stroke and you want to correct or erase part of your painting using an eraser that has the same look and feel of your brush instead of the default Photoshop erasers there are a number of ways to do so in Photoshop.
Perhaps the easiest is to switch your brush mode from ‘normal’ to ‘clear’ which will essentially turn your current brush into an eraser, with all it’s settings in tact. But what if you have switched brushes or recently changed the settings of your brushes and want to go back to a previous brush? There’s an easy way to do that as well. With your eraser tool selected, just open the brush preset panel and you will see the history of the last seven brushes you used in order. Simply select the one you want to use and your eraser now takes on almost all the properties of that brush.
One of the great things about digital painting is that your canvas can be your palette. By holding down the ALT or Option key in Photoshop you can pick a new color from your current painting’s canvas and continue on. Here you can see me travel a tremendous distance from light to dark just by picking a new darker color from the crevices of my previous impasto brush strokes in Photoshop. This was painted using the new Linsee Dew Photoshop Impasto Oil brush
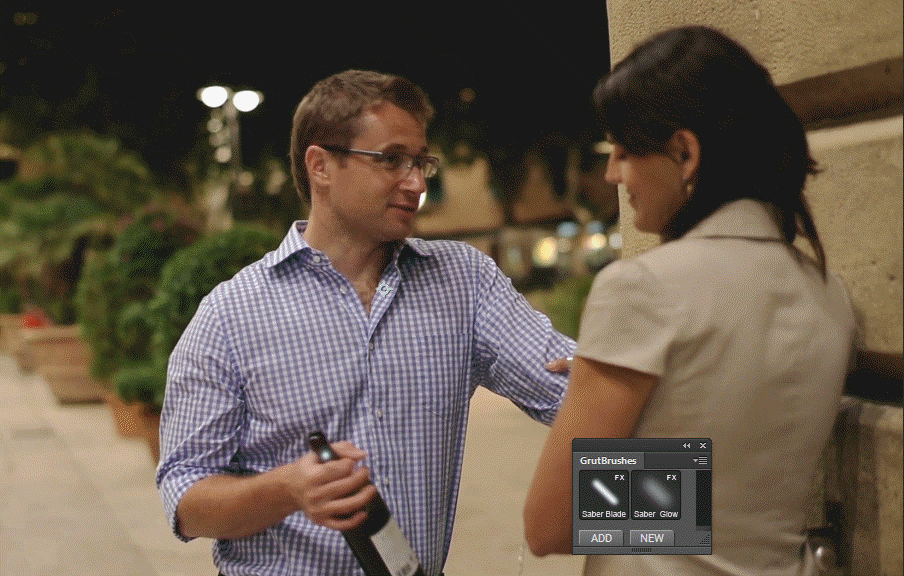
add lightsabers to photos in photoshop with Photoshop brushes
Relive your memories of a night out with friends as a glorious Lightsaber battle instead by adding Lightsabers to all your photos in just a few clicks with these free Photoshop brushes. Use the hashtag #drinksaber so that I can find your creations!
Watercolor in Photoshop can be just as tricky as real watercolor and some of the same techniques apply. A little forethought can go a long way as digital paint ‘dries’ when you lift your pen so ideally you want to do one contiguous area in one unbroken brush stroke. Don’t lift the stylus from the tablet and be prepared that each subsequent stroke will give you a darker colour (see the hair in the top left) due to the multiply effect. Think of it as laying down multiple layers of coloured plastic sheets – the areas where they overlap will be darker and you will see the seams.