Posted on 3 Comments

How to Convert and Export a Photoshop TPL (Tool Preset) to an ABR

This quick multi language video tutorial (click on the globe at the bottom right of the video to change language) or the written tutorial (below) will show you how to convert and export TPL files (Photoshop Tool Preset) to an ABR brush that you can import in other apps like Artstudio Pro, Procreate 5, Adobe Sketch and Fresco

You will need Photoshop CC 2019(?) or later

  1. Find and select the tool preset of the brush you want to convert 
  2. Right click on it, select ” convert to brush preset” and it will show up as an ABR in your Brushes panel

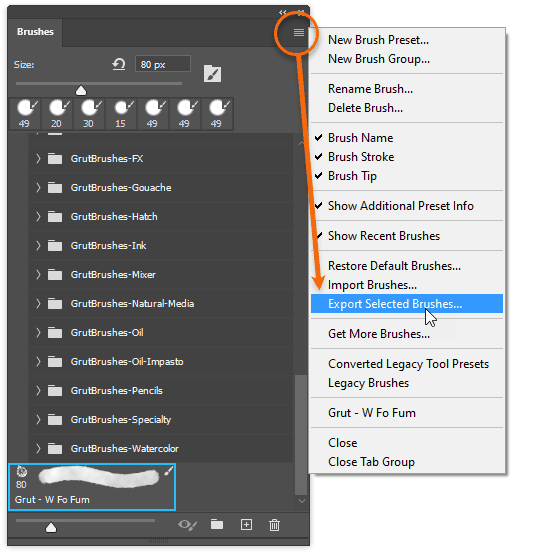
3. Select the newly converted brush in the brushes panel.

4. Click in the top right corner of the brushes panel and

5. Choose “Export Selected Brushes”

You’ve now converted your TPL brush into an ABR that you can import into other apps such as Artstudio Pro or Procreate V5

Facebooktwitterredditpinterestlinkedinmail
Posted on 22 Comments

How To Fix Photoshop Brush Lag

If you find your brush lags as you draw with your stylus, there are (unfortunately) many possible reasons but here are some things to try

The very first thing to do is to turn off smoothing on your brush, if it’s on. This can make it appear as if your brush is lagging but that is just the effect of the smoothing function, slowing your line down to even it out any jitters you may have as you draw. High smoothing will slow down your strokes considerably

Reduce Smoothing to Reduce brush lag in Photoshop

If that doesn’t help, let’s explore some more settings in the preferences (Edit > Preferences >Performance)  that may help…
Continue reading How To Fix Photoshop Brush LagFacebooktwitterredditpinterestlinkedinmail

Posted on 8 Comments

How to Make a Photoshop Brush/Eraser toggle switch on your Stylus

1. Open Tablet Properties
2. Change one of the buttons to ‘erase’

Now when you are in brush mode and you hold down that button on your stylus, your brush will temporarily turn into an eraser! Just release it to return to brush mode and keep painting.

The temporary eraser will have the same settings as the last eraser you used

BONUS TIP: To do this without changing your preferences, just press and HOLD the “e” key to erase temporarily. Keep holding the “e” key until you are done erasing, then when you lift your stylus and then release the “e” key your tool will switch back to the brush tool!

I know you can flip the stylus over and erase, but why interrupt your flow when you can just press on a button?

BONUS TIP 2: Digital artist SyntheticGeek added this great tip for Wacom tablet users:

“I add Keystroke Modifiers to my Wacom Stylus buttons so I can more quickly use ANY brush preset as an eraser. One button to change it to a “Clear” GrutBrush and one to change it back. “Alt + Shift + R” will change it to a Clear (erasing) GrutBrush and “Alt + Shift + M” will take it back to “Multiply”.

NOTE; Not all GrutBrushes’ painting opacities are set to Multiply as their default, some are set to Normal, which would be “Alt + Shift + N”. (for Mac users Alt = “Option”). You can always just tap the brush preset again in the GrutBrushes Tool Panel. That way, you don’t have to wonder if its default was Normal, Multiply or Whatever. “

How to make a custom button that turns your Photoshop brush into an eraser


You could adapt it to any tablet or hardware that allows custom keyboard commands to be programmed to a button

 Facebooktwitterredditpinterestlinkedinmail

Posted on 2 Comments

Adobe update breaks brush-to-eraser-tool hack Here’s a workaround

UPDATE 2020:  Simplest method of all…while painting, hold down the TILDE key: ` (usually at the top left of your keyboard while you are painting and your brush will turn into an eraser, with all the same properties, as long as you hold it down)

If, like me, you loved being able to select any tool (usually the eraser) and then pick from your most recent brushes to convert a paint brush to an eraser, or a mixer brush, or a smudge tool with all dynamic setting intact you can’t do this anymore with the latest Photoshop update (v 19) You can still use the clear mode trick to convert your brush to an eraser which I go over in the aboce video inclusing the keyboard shortcuts.

The keyboard shortcut I use in the video are
Normal Mode:
WIN: Shift+Alt+N
MAC: Shift+Alt+N)

Clear Mode (eraser mode)
WIN: Shift+Alt+R
MAC: Shift+Option+R

You can find the full list of brush mode keyboard shortcuts on the Adobe website here It’s a long list so search the page for “Use for blending modes”Facebooktwitterredditpinterestlinkedinmail

Posted on Leave a comment

How to Install New brushes into Photoshop automatically using the plugin (Video Tutorial)

One click installation of Photoshop brushes into Photoshop

Buying the Artbrushes Photoshop brushes Set gives you a free two month  membership, which includes all new brushes published in the Shop for 60 days, if you are a Photoshop CC user and are using the GrutBrushes plugin you can install the newest brushes without even leaving Photoshop. This 30 second tutorial shows how it’s done.

Tips:

  • The Photoshop brushes are always listed in order of publication, with the newest one shown first.
  • If you can’t remember if you installed the newest Photoshop brush, Click install and the plugin will let you know if you have it already.
  • The web panel is slow to load, you may think nothing is happening but it should load within about 15 seconds (im trying to change this)
  • The red play button will pop up a video preview of the brush in action.

Facebooktwitterredditpinterestlinkedinmail

Posted on Leave a comment

How to Install Photoshop Brushes to the Plugin via the Web

If you have an active GrutBrushes membership you can add and install brushes directly into Photoshop via the GrutBrushes plugin panel using the “New” button.
You may think that it is broken, but it is likely just slow to load. I’m very sorry about that, but with a bit of patience, it is fast once it loads up. This 45 second video shows you how it’s done.

If you don’t see the screen with all the brushes, you can navigate to it in the menu by going to My Account > Members Brush PortalFacebooktwitterredditpinterestlinkedinmail

Posted on 2 Comments

Impasto Painting in Photoshop – Quick Tips 01

Here are a few quick tips to get you going with the Photoshop Impasto brushes

I will be doing a series of tutorials on how to use the GrutBrushes Photoshop Impasto brushes but this short video above shows a few brief tips.

To summarise:
– Vary your stylus pressure and use short strokes for a more organic look
– Use a flatter Photoshop brush to block in large areas
– Press softly on your stylus to blend or soften texture
– Push harder when you want more texture
– Use alt/option to pick colours from your painting

Brush Strokes and animated previews

Photoshop Impasto painting with GrutBrushes


Impasto Brushes from Impastos 01

(Mouseover or tap the icons below to watch the Photoshop brushes drawing ‘live’!)


'Gravel Plough' Photoshop Impasto brush
‘Gravel Plough’ Photoshop Impasto brush


'Granite Sack' Photoshop Impasto brush

‘Granite Sack’ Photoshop Impasto brush


'Horse Main' Photoshop Impasto paint

‘Horse Main’ Photoshop Impasto brush


'Imp Giganto' Photoshop Impasto paint

‘Imp Giganto’ Photoshop Impasto brush


'Gypsum Slate' Photoshop Impasto brush

‘Gypsum Slate’ Photoshop Impasto brush


'Venal Weasel' Photoshop Impasto oil paint

‘Venal Weasel’ Photoshop Impasto oil brush


'Venal Weasel' Photoshop Impasto oil paint

‘Venal Weasel’ Photoshop Impasto oil brush


'Cliff Quarry' Photoshop Impasto oil paint

‘Cliff Quarry’ Photoshop Impasto oil brush


'Tenor Wake' Photoshop Impasto oil paint

”Tenor Wake’ Photoshop Impasto oil brush


'Jee Beach' Photoshop Impasto oil paint

‘Jee Beach’ Photoshop Impasto oil brush


Facebooktwitterredditpinterestlinkedinmail

Posted on Leave a comment

Install the Free Photoshop Brush of the Week without Leaving Photoshop

If you are a Photoshop CC 2014 or 2015 user you can use the GrutBrushes plugin to install the free Photoshop brush of the week directly into your tool preset panel and GrutBrushes panel without ever leaving Photoshop!

installing free photoshop brush of the week using the grutbrushes artist toolset brush plugin

Instead of clicking on the “Add” brush button to add brushes from your local computer, click on the “New” brush button to add brushes from the web.  In the window that opens, navigate to the Free Photoshop brush of the week page and as long as you are logged in (signing up is free) you will see the orange download button, click on it and watch as this week’s free GrutBrush magically downloads, installs, and appears right in your GrutBrushes plugin panel.

Members get to do this with every brush in the shop via the brush portal page so, join as a member or feel free to just keep downloading the free brushes.

plugin:
grutbrushes.com/plugin
Free Photoshop brush of the week:
grutbrushes.com/freebrushFacebooktwitterredditpinterestlinkedinmail

Posted on 4 Comments

Add LightSabers to Photos with the Lightsaber Photoshop Brushes

how to add lightsabers to photos in photoshop with free Photoshop lightsaber brushes
add lightsabers to photos in photoshop with Photoshop brushes

Relive your memories of a night out with friends as a glorious Lightsaber battle instead by adding Lightsabers to all your photos in just a few clicks with these free Photoshop brushes. Use the hashtag #drinksaber so that I can find your creations!

Continue reading Add LightSabers to Photos with the Lightsaber Photoshop BrushesFacebooktwitterredditpinterestlinkedinmail