Art Surfaces – Paper textures for digital artists
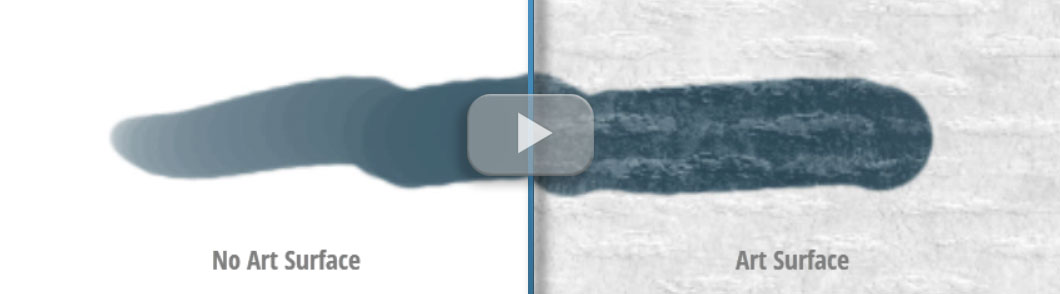
Art Surfaces from GrutBrushes are professional paper textures for digital artists to paint or draw on in Photoshop. These seamlessly tiling, layered Photoshop templates add realistic paper, canvas and other surface textures to your digital paintings and drawings, including the light and shadows cast by the finest microsurface features of the paper textures that they simulate.
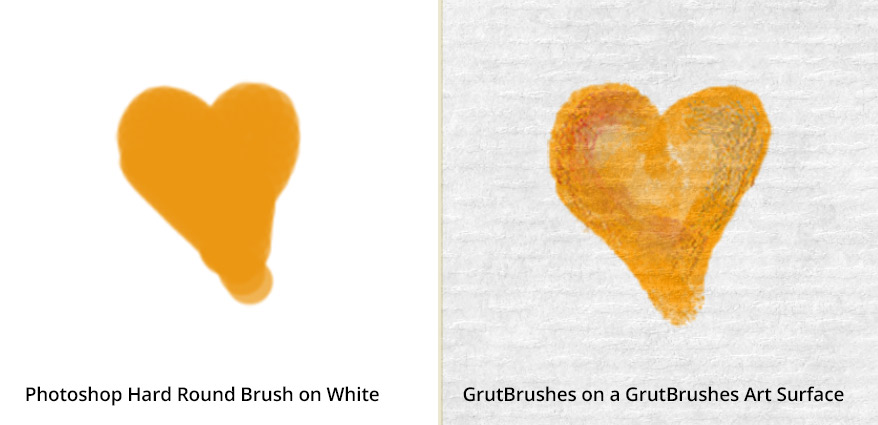
Click the hearts image to see how GrutBrushes Art Surfaces + GrutBrushes can mimic real media
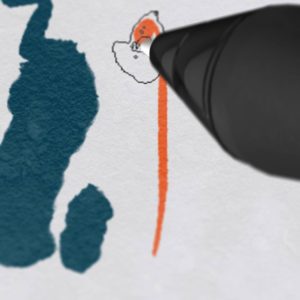
In the real world, pastels don’t form a plastic layer above the paper, they get grated into the pores of a heavily textured professional artists paper. The toothy, stained peaks catch the light while the waxy remains coat the valleys of this microscopic landscape. These Photoshop templates (Art Surfaces from GrutBrushes) attempt to mimic those physical properties with ‘smart’ paper templates.
Add Natural Warmth to Your Digital Paintings
GrutBrushes Art Surfaces paper texture templates auto-magically apply these lighting effects to your drawings and paintings live as you paint in Photoshop (or later if you prefer) with non-destructive, removable Layer Comp presets that you can apply, remove or tweak as you see fit to give you a natural looking paper texture base that integrates seamlessly with your drawings and paintings to give them that organic warmth so often missing from digital paintings.
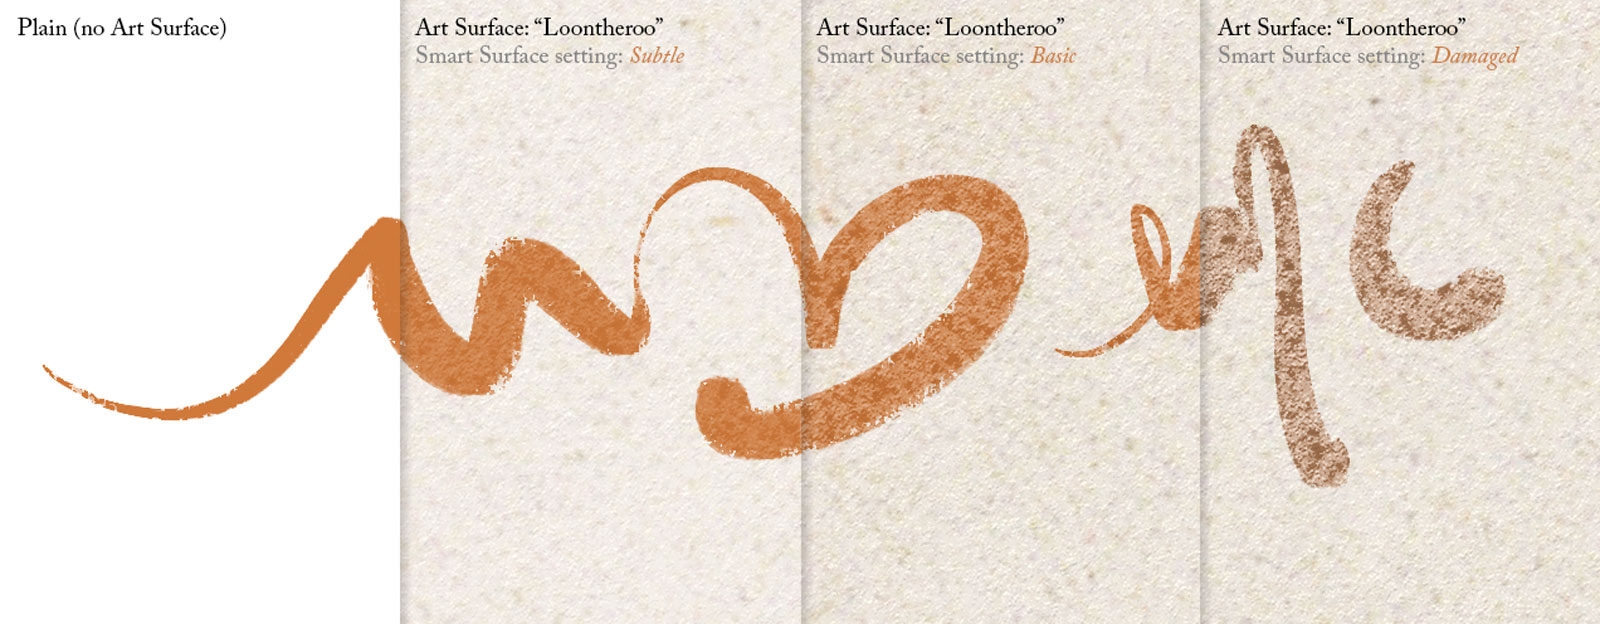
Each Art Surface contains 4 to 10 ‘Smart Surface’ settings which let you change the look of your surface texture and the artwork with one click of a button.
Try One For Free!
Update: The Paper Textures are now available in the shop with many more to come.The Paper Texture is “LIVE”! — Art Surfaces are applied as you paint
These are not plugins or effects that you have to ‘run’ to apply to your artwork, they are layered Photoshop files into which you can draw and paint ‘live’ Which also means you can just as easily remove the paper texture layers and your RAW artwork will always be available, untouched by the Art Surfaces.
How to use them:
- Open the PSD file in Photoshop
- Start painting in the green layer and the paper texture is automatically applied ‘live’ as you draw or paint
(You can download the manual here)
This has many advantages including:
- Non-destructive: Change your mind and change your texture!
- Your original ‘RAW’ artwork is always available
- The texture is not dependent on your brush texture
- Paste any artwork into an Art Surface to apply the paper texture
*Painted using a watercolor brush from the Photoshop Art Brushes Collection
Change the surface appearance instantly with ‘Smart Surfaces’
Although the Basic or Subtle setting will probably do for most situations, each Art Surface PSD includes 4 to 10 ‘Smart Surfaces’ Presets that instantly apply different looks like ‘Damaged’ ‘Worn’ or ‘Handmade’ You can also tweak the surface appearance manually if you want, but these presets are there for you if and when you want them
The surface textures are all ‘non-destructive’ which means that you can change your mind and change the texture at any point by selecting a new Smart Surface from the Layer comp window
These are not plugins, they are simply Photoshop layered files (PSD format)
NOTE: Any new layers you add will be turned off when you switch layer comps so you will either need to work just in the green layer, or manually turn on any new additional paint layers when you switch layer comps. I’m trying to figure out a way around this but it’s how Photoshop works
Try This Slider and See the Difference Instantly!
High Resolution Seamless paper textures that automatically tile infinitely!
• All the Art Surfaces are high resolution seamless looping textures that tile automatically, infinitely, in all directions.
• They begin as a 2048 x 2048 300dpi HD paper texture but can be scaled to any aspect ratio you need.
• No need to copy or paste anything manually, you can do all resizing instantly with the crop tool.
- Select the crop tool
- Drag the edges out as tall or wide as you need and the paper texture background will expand to fill your image.
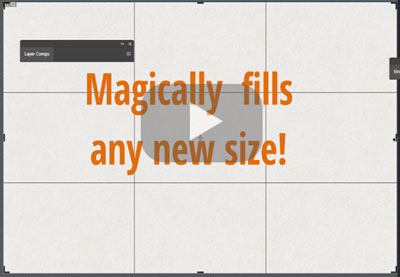
All the lighting effects will also automatically expand to fill the new paper size, including all the Smart Surface settings which work no matter how big or small you make your canvas.
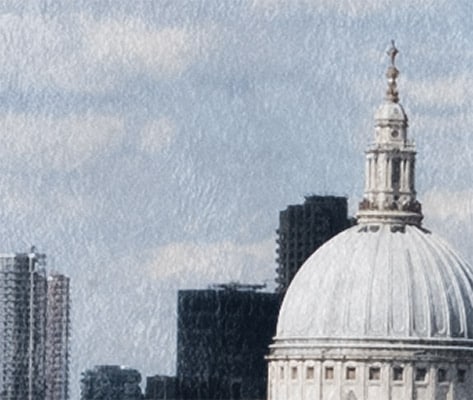
Add Paper Texture to your Photographs!
[baslider name=”papertextureonlondonphoto”]You can drop photos into Art Surfaces to add texture to your photographs. Try out the various Smart Surface Layer Comps until you find a style that works with your photo. See how the effect is done in this short video: Adding Paper texture to your Photographs.
Stay Close For Maximum Texture
Keep in mind, it may look like magic, but even a perfect seamless tiling paper texture will start to show repetitive patterns if you loop it too many times.
More importantly, the more you zoom out, the less visible your paper texture details become which defeats the whole purpose of using a paper texture.
Think of it this way; If you are going to look at your painting from the top of a building does it really matter if it’s painted on canvas or cardboard? You won’t be able to see the texture details anyway
Sometimes you may actually want to go the opposite direction and zoom in (enlarge the Art Surface) for all the tasty details the textures have to offer
Crop tightly for a more detailed paper texture
In fact, you may find you actually want to scale them up to get more detail, for an intimate close up view with lots of texture. Most of these textures are crisp enough to survive magnification up to 200% without visible pixelation, especially if a good portion of your image is covered with artwork. Just make sure you scale them up before you paint so that you can paint your own parts in full resolution. With older completed work, scale the Art Surface before you paste your work into them and you can give the appearance of a close up view of your painting.
If you find you ever find you’ve cropped it too tight you can always magically add some more to the sides of your canvas by using the crop tool and dragging out the edges and the paper will expand to fit your needs
Get a Free Paper Texture Art Surface!
They are available in the shop now but you can try one for free on me!
This one is slightly older version but almost the same as the final Art Surfaces available in the shop now

Update Feb 8 2018: The first paper textures are available here in the shop now!
Many more textures to come
Frequently Asked Questions
Q: Does this work with Photoshop CS?
A: It should work in Photoshop CS6 and up. If in doubt you can [thrive_2step id=’416353′]click here to try one for free first.
[/thrive_2step] I haven’t been able to try them in Photoshop CS but I’m told it doesn’t work in CS5.
Q: Where can I download the Art Surfaces Manual?
A: You can download a PDF here or read the Google Doc online here
Q: I already do this by pasting a texture on top and switch it to ‘Multiply’ mode. Isn’t this the same thing?
A: That is a neat, quick and dirty method to add the appearance of texture to bright and mid toned areas of an image but remember that the lighting you see in the real world is not just about shadows, it’s also light. The bumps of the paper will be brighter where the light catches them, and they will also catch the light differently depending on what they are made of.
Shiny, glossy papers will have tiny specular spots of light on the ridges whereas more matte card stock will have wider, less bright spots spread out over a wider area. Adding a layer with Multiply mode will not add any lighting at all, just a pseudo shadow.
The Art Surfaces have many other advantages too, 5 to 10 Smart Surface styles, auto-tiling, seamless, infinite canvas, high resolution suitable for print, I could go on!
Q: When I switch Smart Surfaces Layer comps my artwork disappears
A: Only the green “Artwork Goes Here” layer will remain visible when you switch looks, all other layers will be switched off. Your artwork is still there, it’s just that the Layer Comp setting has turned them off. Click on the eye next to the invisible layers to make them visible again. You will have to manually make any other layers you add visible. The best practice is to paint on the green layer or paste a merged copy of your painting onto it if you want to try out the different looks.
Q When I tile it 5 times horizontally I can see a repeating pattern. How come?
A: The only way to get rid of absolutely all signs of a repeating pattern is to get rid of all unique or distinct areas of texture so that your eyes don’t pick up on the repeating patterns when the image is ‘looped’ many times. If I got rid of all the unique and distinct markings, blotches, imporities and other characteristics, the paper textures become very sterile and lose their character.
Another important factor to keep in mind is that sometimes, even if you can, you won’t want to loop the image too many times. It may actually be preferable to scale the image up instead and sacrifice a little bit of resolution so that you can still see the detailed features of the papers. If you zoom out to outer space, why even have a paper texture at all? You wont be able to see any of the delicious bumps, creases and pores of your Art Surface that make it unique.
The main point of the magically expanding seamless surface is so that you don’t have to be constrained to the shape you start with and can easily switch from portrait to landscape with the drag of the crop tool any time you want to.