These Art Surfaces have a lot of features, so let’s dive in so you don’t miss out on anything...
Procreate users: These instructions are for the Photoshop version. The Procreate App doesn't support Layer Comps or the infinite canvas scaling so there is not much to know for those. You basically open them in Procreate and paint! (make a copy first!)
Quick Start
To jump right in, open the PSD file in Photoshop and start painting in the green layer titled “Artwork Goes Here”
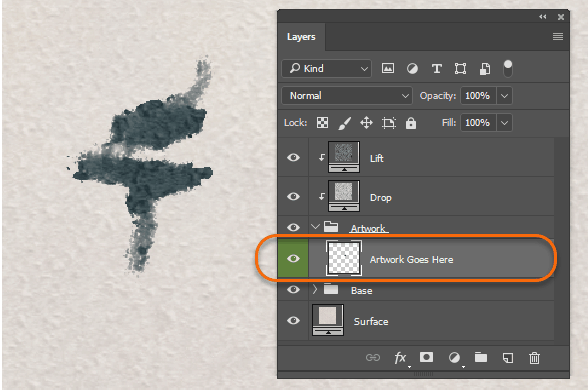
You will see that the paper texture is applied to your painting as you paint
Change the Look Instantly with Layer Comps
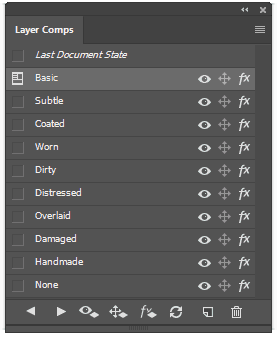
Each Photoshop Art Surface comes with 4 to 10 Smart Surface settings which are available in the Layer Comps Panel (Open it from the menu: Window > Layer Comps)
Smart Surfaces are “non-destructive” which means they are not permanent and you can switch looks or remove them at any time and your original artwork will remain untouched!
These are the ten most common Smart Surface settings you will find in most GrutBrushes Art Surfaces.
When you open the Art Surface PSD in Photoshop it will probably be set to Basic by default. Procreate Art Surfaces are by default, somewhere in between Basic and Subtle
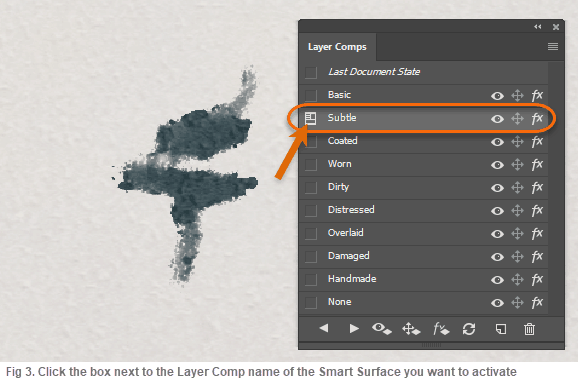
To switch to any other look, just select the checkbox next to the you Smart Surface you want to apply and you will instantly see the effects applied to your artwork.
TIP: Personally, I recommend using the "Subtle" setting. I think it is the most realistic and useful of all the presets. The texture is less prominent and that keeps the focus on the artwork itself.
Other settings like Worn, Dirty and Distressed are much more dramatic

Every Smart Surface will affect each piece of artwork in a unique and different way. Only a few may be suitable for each particular piece but trying them all may give you a different perspective on your work
You will usually find that either the Basic, Coated or Subtle setting will do in most cases.
To check your art without any Art Surface texture at any time just select None.
To see the your artwork on top of the surface without any lighting or shading effects, select the Overlaid setting
Importing Photos or old artwork into Art Surfaces
You can paste anything into an Art Surface, including previously created drawings, paintings, scanned artwork, graphics, logos or even photos. Here are 2 ways to do it
- Method 1: Copy the photo or artwork you want to paste into your Art Surface, then paste it into the green layer of the Art Surface (cmd/ctrl + v) You can use merge down (Layer > Merge Down or cmd/ctrl + e) to merge it into the green layer which will keep it visible while switching Layer Comps
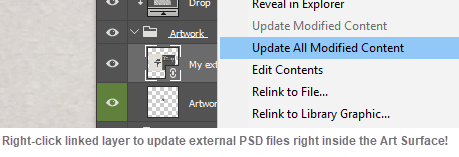
- Method 2: Embed an external file into the Art Surface. In Photoshop, Select File > Place Linked to embed another file, even a PSD file into the ‘Artwork’ layer folder. If you use Place Linked you can always edit the original file and just update the layer to refresh it
Adding New Layers
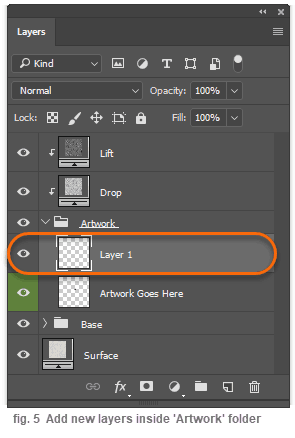
To add layers to your artwork, always add them inside the Artwork layers folder (left). That way the lighting and shadow effects of the Art Surface will be applied to the new layer. Unless you are...
Painting With Thick Paint
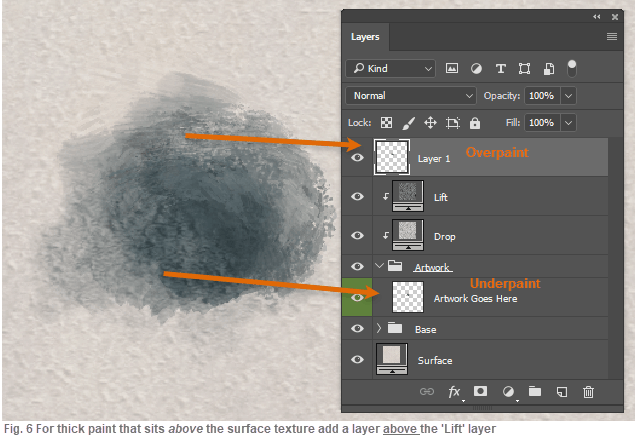
To add layers of thick paint, like an impasto oil paint or a thick pastel, add a new layer above the ‘Lift’ layer and paint in there (fig. 6)
These will be unaffected by the Art Surface texture and will sit on top of it.
This is also great for painting like the Old Masters did. Paint your thin underpainting in the green Artwork layer and your overpainting in a new layer above them all. Keep some of the green underpainting layer visible underneath amidst the overpainting, for an ultra realistic look.
Note: Any layers you add will get turned off when you switch "Smart Surface Styles" (Layer Comps) See here for more info
The Disappearing Layers Issue
Unfortunately, when you switch Layer Comps to apply a different look, any new layers you added will become invisible. This is due to the way Photoshop Layer Comps work and there is currently no way to stop it. To see them again, click on the eye next to the layer name.
Here are two imperfect workarounds:
- Merge all paint layers into the original green layer. The green Artwork layer will always be visible in any Smart Surface Layer Comp. Or...
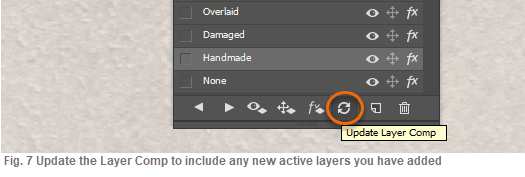
- Reactivate your new layer(s) and then click the Update Layer Comp button while your new layer is visible. The active Layer Comp (‘Handmade’ in fig. 7) will now include your new layers. You will have to do this once for each Layer Comp you switch to whenever you add new layers
TIP: If you typically paint with a lot of layers, a best practice is to pick a Layer Comp style you want to use in the beginning, leave the green Artwork Layer empty and just keep adding new paint layers as needed.
When you feel your painting is at a key stage, select all the paint layers, "Copy visible" and paste that, as a single layer, into the Green Artwork Layer. When you switch layer comps now, even though your paint layers will disappear, your Artwork (copy ) will remain visible while you switch styles
Scaling and Tiling your Art Surface
GrutBrushes Art Surfaces are infinite, seamless canvasses, which means that it tiles seamlessly forever in all directions beyond all four edges of your canvas.
To reveal more of this infinite canvas, just select the crop tool and drag outside the edges of your canvas and hit ‘Enter’ Once you do that the Art Surface will expand to fill in the new space where the checkerboard pattern is.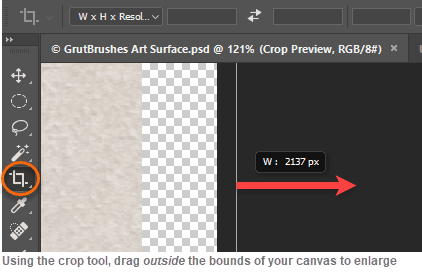
Keep in mind that even a tiled surface will show a repeating pattern if you loop it too many times. The infinite canvas is really meant to free you from being locked to a fixed aspect ratio or running out of room at the edge of your image . You can easily switch from a landscape to a portrait format by dragging out one of the edges.
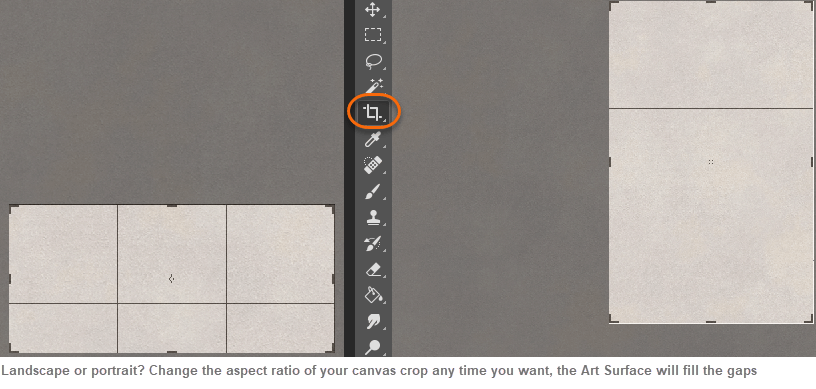
The larger you make your canvas, the more you are in effect ‘zooming out’ from your canvas and your surface texture will become less and less prominent, so try to crop inward if you can, to keep the textures visible. There’s no point in painting on a beautifully textured canvas if you are going to look at it from outer space.
There are times when you may even want to zoom in to show even more texture in a close up painting. All GrutBrushes Art Surfaces are 300 dpi so even if you zoom in to 200% they will still be 150dpi. Whch should be plenty for most web work.
To do this, select Image > Image Size from the menu and select a width larger than the current size. Some Art Surfaces will be able to handle scaling better than others and how big you can go depends on how much sharpness you need.
It is important that you enlarge your Art Surface before you paint or your paint strokes will be scaled as well and that will defeat the whole purpose of scaling it.
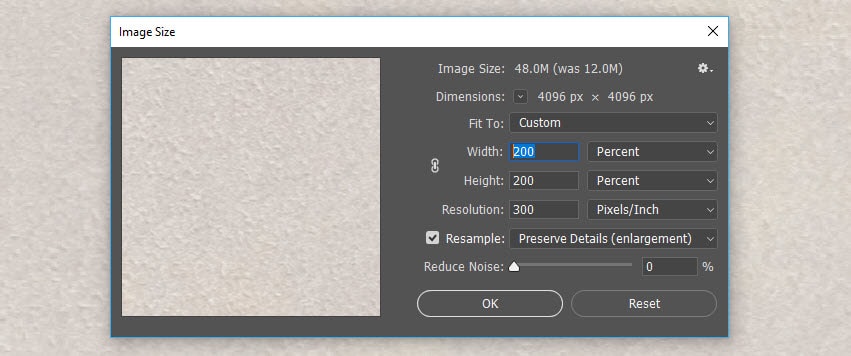
There is no way to enlarge any pixel image (in any app) without reducing the effective resolution. In any raster image (non-vector) there are no more hidden pixels to be revealed. If you do need a larger canvas size with the same dpi, always use the crop tool method to extend the borders. This will ensure your resolution always remains constant.
If you need a higher dpi have a look at this advanced dpi scaling tutorial
Embedded Info Note
In the bottom left corner of every Art Surface is a little Photoshop note which can be opened by double-clicking on it. In it you will find some of the tips (like these) as well as the name of the Art Surface.
This can be useful after you have saved your artwork with a different name and want to know which Art Surface you used. Feel free to hide move or even delete this note if you’d like.

You can also find out the original Art Surface name embedded in the file from the menu by selecting File > File Info
Overview of "Smart Surfaces" (Layer Comps) settings
(Photoshop version only)
Basic: This is the default setting and shows the texture fairly prominently in both the background and on the paint layer.
Subtle: Both the background and the paint layer textures are toned down and less defined. This allows the artwork to be more prominent.
Coated: Subtler texture on the paint layer but strong surface texture below. This surface acts as if lightly coated in clay and is therefore less absorbent, so the texture on your paint will be subtler making it appear slightly more opaque.
Worn: The raised texture of the surface has been worn down and some paint has rubbed off.
Dirty: The recessed divots in the surface are darker where dirt has collected.
Distressed: Wear and tear appears on the surface bumps as well as dirt in the crevices.
Overlaid: Just your artwork overlaid on the background. No surface texture lighting or shadow applied to the artwork (very handy to quickly check your untouched artwork)
Damaged: Extreme version of Distressed.
Handmade: Raised surface texture like you find with handmade papers. This one may cause your computer to lag a bit when painting as it applies layer effects “live”
Oily: More texture depth, often with a higher specularity on the peaks of the textures. Essentially, a surface with wetter or shinier bumps
None: Click this one to quickly remove both the background texture and the overlaid surface texture and lighting effects. Basically just your artwork on a white layer.
Additional Tutorials
How to increase the dpi to 600 dpi (reduces size of grain as well and not recommended for tiling more than 4 to 5 times)
You can find the latest Paper Texture Art Surfaces Paper Textures in the shop:
grutbrushes.com/product-category/paper-texture/
Questions? Email me at info@grutbrushes.com
