Posted on 4 Comments

Wacom Stylus Pressure Not Working?

This will show you how to check if your tablet pressure is working in Photoshop. It can be tricky to tell if your stylus or pen is not working or if it is just that brush, especially with fancy brushes that seem to change as you paint with them. This test will account for that.

TLDR: In short, If you can vary the pressure and or transparency of your brush strokes while painting with the default hard round brush and pressing harder or softer on your stylus, then the pressure from your stylus is being successfully sent to Photoshop.

This first test will start you off with a basic brush, enable pressure and then test to make sure Photoshop is getting pressure data from your stylus.

Note: This video has subtitles available in about a dozen languages Click on CC to select


Next up is a similar test, to check your pressure response but using transparency

Make sure you have Opacity pressure set to “on” Watch the tutorial below to see how it’s done

Summary:
Wacom Pen not working? If a line drawn with your mouse looks identical to a line drawn with your stylus while varying the pressure you apply to it with your stylus, and the “opacity pressure” box is checked, then Photoshop is not getting any pressure signal from your pen, stylus or tablet. 

turn on 'use pressure' checkbox for pressure opacity
Make sure this box is checked ‘on’ if you want your pen pressure to affect the opacity of your brush stroke

The easiest and most successful solution is usually just to reboot. Especially if your stylus pressure was working fine just a few minutes before. If that doesn’t solve the problem then it is almost certainly a tablet driver issue and you should check for the latest appropriate driver for your tablet.  

Restart Wacom Driver Without Rebooting

If you are using a Wacom tablet on Windows, you can try to restart your tablet driver before trying a full reboot.

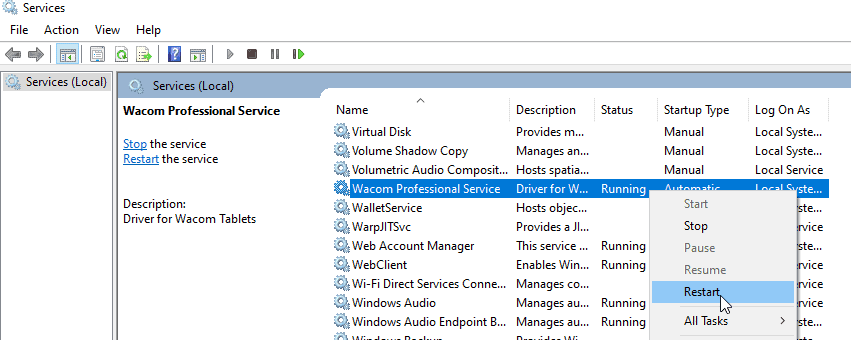
If the tablet driver has stopped working you can restart it by going to the Windows Start search bar, type “Services” and open the “Services app

Scroll down until you see “Wacom Professional Service” Right-click on it and choose “restart” 

Windows services panel with 'restart Wacom service' selected to restart tablet driver without rebooting
You can usually restart Wacom Tablet driver in Windows without rebooting

For more problem solving tips, including very common Windows Ink issues and to download Wacom tablet drivers go here

Huion Tablet Driver downloads are here

Yiynova tablet driver downloads are here 

XP-Pen Pressure Not Working?

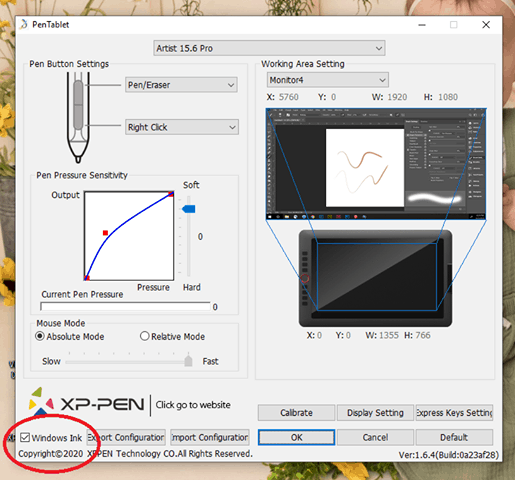
If you use an XP-PEN and your brush strokes are not responding to pressure from your XP-Pen, open the PenTablet properties and make sure that the ‘Windows Ink’ check box in the bottom left is selected as shown in the screenshot below.

XP-PEN PenTablet preferences with Windows Ink checkbox selected
Turn on Windows Ink checkbox in XP-PEN PenTablet preferences to use pressure in Photoshop (Thanks for the screenshot Beth M!)


When you restart Photoshop your XP-Pen pressure should be working in Photoshop  

Feel free to leave additional questions in the comments and I’ll answer if I can. 

Facebooktwitterredditpinterestlinkedinmail
Posted on 5 Comments

How To Convert Any Photoshop Brush to a Mixer Brush

Did you know that you can convert any Photoshop brush to a mixer/blender brush by holding down ctrl+alt on Windows or Cmd+Option and clicking on it? I show you how in less than 30 seconds in this Photoshop video tutorial.

Keep in mind that not all brushes will make ideal mixer brushes and you will almost certainly want to tweak it once you make it.

Facebooktwitterredditpinterestlinkedinmail
Posted on 3 Comments

How to Convert and Export a Photoshop TPL (Tool Preset) to an ABR

This quick multi language video tutorial (click on the globe at the bottom right of the video to change language) or the written tutorial (below) will show you how to convert and export TPL files (Photoshop Tool Preset) to an ABR brush that you can import in other apps like Artstudio Pro, Procreate 5, Adobe Sketch and Fresco

You will need Photoshop CC 2019(?) or later

  1. Find and select the tool preset of the brush you want to convert 
  2. Right click on it, select ” convert to brush preset” and it will show up as an ABR in your Brushes panel

3. Select the newly converted brush in the brushes panel.

4. Click in the top right corner of the brushes panel and

5. Choose “Export Selected Brushes”

You’ve now converted your TPL brush into an ABR that you can import into other apps such as Artstudio Pro or Procreate V5

Facebooktwitterredditpinterestlinkedinmail
Posted on 4 Comments

How to Scale a Photoshop Art Surface Paper texture to 600dpi

A customer told me that she always works in 600 dpi and wanted to put her artwork into an Art Surface and make sure it remained at 600 dpi so I made this video for her, showing two different ways to do it. There’s a text summary below the video

Method 1
Change the dpi to 600 dpi with resampling off (unchecked) Then paste your 600 dpi image into it (into the green ‘Artwork’ layer)
Then you can use the crop tool to increase your canvas size to any size you need and the background will magically fill in the paper texture seamlessly.
Continue reading How to Scale a Photoshop Art Surface Paper texture to 600dpiFacebooktwitterredditpinterestlinkedinmail

Posted on Leave a comment

How to Install GrutBrushes Photoshop Brushes from the Web Right into Photoshop using the plugin

Did you know that you don’t have to leave Photoshop to install the latest GrutBrushes?

Just watch this video tutorial below or read the text version below to learn how (or read on for the text tutorial)
[vooplayer type=”video” id=”MTM0MTk1″ ]

Facebooktwitterredditpinterestlinkedinmail

Posted on 3 Comments

How to Add Paper Texture to a Photo in Photoshop (Tutorial)

How to add paper texture to Photos in Photoshop

In this 2 minute Photoshop tutorial I show you how you can easily add a realistic paper texture to your photos in Photoshop using GrutBrushes Art Surfaces.
They are not just for digital painting!

[vooplayer type=”video” id=”MTA0Nzc2″ ]

All the paper textures shown in the video are now available in the shop but if you haven’t had a chance to try one yet, just click below to download.

Try One For Free!

Make sure you check out the online tips and tricks manual which includes a quickstart video!Facebooktwitterredditpinterestlinkedinmail

Posted on 5 Comments

How to Export Multiple Photoshop Brushes as a Single TPL (to Import into Artstudio Pro)

Q: Can I use GrutBrushes on an iPad Pro?
A: Yes!

I get this question almost every day now and while I don’t have any proper documentation for it yet, you can import GrutBrushes TPL files into both Artstudio Pro (I love this app!) and Adobe Sketch apps

You can import any of the GrutBrushes TPLs right now, but you probably don’t want to import them one at a time. So, in this super-quick video tutorial I show you how to export a batch of TPL brushes into one file all at once. That way you can just upload that single TPL containing all your favourite GrutBrushes to DropBox, iCloud or whatever you use to get files onto your iPad.

Once you have it in the cloud you can import it into Adobe Sketch or Artstudio Pro (shown below) Someday I hope to make a video tutorial showing the whole process, but until then, both apps do currently have information in their documentation on how to import Photoshop brushes so have a look around.

Importing Photoshop Brushes (TPL) into the Artstudip Pro app on the iPad Pro

Here I am using the GrutBrushes pattern brushes on the iPad pro! Using GrutBrushes with the Apple Pencil is a dream.

GrutBrushes pattern brushes work in ArtStudio Pro and Adobe Sketch on Ipad ios
GrutBrushes can be imported into ArtStudio Pro and Adobe Sketch on th  iPad Pros


…and no, sorry, you can’t use these GrutBrushes in Procreate! It has it’s own wonderful brush format but it can’t import Photoshop brushes. UPDATE: Procreate GrutBrushes are now available! They are not the same as the Photoshop brushes but I think you’ll like them just as much

There are dozens of  apps that claim to be able to import Photoshop brushes but what most of them mean is that they can import the tip shape, but that’s just the most visible but probably the least important feature of a good digital brush.

GrutBrushes are all about the dynamics…HOW the brush behaves, not what it’s brush tip shape looks like.

Unless an app imports all the brush dynamics it’s really not importing the brush.

Adobe Sketch and Artstudio Pro are currently the only apps that can import GrutBrushes Photoshop brushes. If any new apps come along that claim to be able to import Photoshop brushes and all the brush dynamics please let me know, I’ll be the first to buy it and test it out.Facebooktwitterredditpinterestlinkedinmail

Posted on 8 Comments

How to Make a Photoshop Brush/Eraser toggle switch on your Stylus

1. Open Tablet Properties
2. Change one of the buttons to ‘erase’

Now when you are in brush mode and you hold down that button on your stylus, your brush will temporarily turn into an eraser! Just release it to return to brush mode and keep painting.

The temporary eraser will have the same settings as the last eraser you used

BONUS TIP: To do this without changing your preferences, just press and HOLD the “e” key to erase temporarily. Keep holding the “e” key until you are done erasing, then when you lift your stylus and then release the “e” key your tool will switch back to the brush tool!

I know you can flip the stylus over and erase, but why interrupt your flow when you can just press on a button?

BONUS TIP 2: Digital artist SyntheticGeek added this great tip for Wacom tablet users:

“I add Keystroke Modifiers to my Wacom Stylus buttons so I can more quickly use ANY brush preset as an eraser. One button to change it to a “Clear” GrutBrush and one to change it back. “Alt + Shift + R” will change it to a Clear (erasing) GrutBrush and “Alt + Shift + M” will take it back to “Multiply”.

NOTE; Not all GrutBrushes’ painting opacities are set to Multiply as their default, some are set to Normal, which would be “Alt + Shift + N”. (for Mac users Alt = “Option”). You can always just tap the brush preset again in the GrutBrushes Tool Panel. That way, you don’t have to wonder if its default was Normal, Multiply or Whatever. “

How to make a custom button that turns your Photoshop brush into an eraser


You could adapt it to any tablet or hardware that allows custom keyboard commands to be programmed to a button

 Facebooktwitterredditpinterestlinkedinmail

Posted on 6 Comments

How to Install the Photoshop Plugin – 60 Second Tutorial

This Photoshop tutorial video will teach you how to install the free Photoshop CC plugin in less than a minute. Need to download some free Photoshop brushes to go with it? Try the free sampler set.

Note: this Photoshop plugin installation video was recorded on a Windows computer but apart from the the unzip/extract process being slightly different, all the rest is virtually identical

Any trouble check the help page or send me an email.Facebooktwitterredditpinterestlinkedinmail